Showing posts with label baking. Show all posts

Thursday, January 28, 2010

Outback Bread

Okay, last night I had another epic bread making FAIL while trying to make Outback Steakhouse bushman bread. This is what it's supposed to look like:

Can't you just taste the slightly sweet, warm, pillowy softness?

Aaaaaaaand this is what I got:
Bland, hard, and only fit for propping the door open.
(Please note poised position above the trash can, where it now lies)
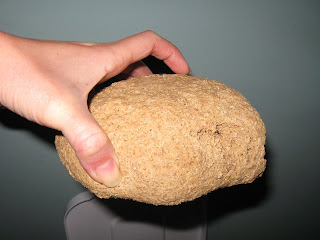
Okay, in defense of the recipe I've tried to make, I only was able to use half the called for amount of molasses (I ran out). When I usually make it, the taste is pretty good but it is still hard and has the darndest time rising to a nice fluffy loaf.

So I now pose a challenge: I am going to post three Outback Steakhouse recipes. The first is the original recipe that I have been trying to make work for three years but never seem to be able to cooperate for me (I am fully aware that it could be solely that I am still not a seasoned bread maker). The second is almost an identical recipe, but calls for more yeast. The third is a completely different recipe.

Now, my challenge to you is this: try your hand with at least ONE of these recipes and tell me what happens. Does it come out soft and tasty? Or is the recipe defunct? Did you do anything differently? Does rye flour need added gluten to rise properly? Do I need to hire a priest to exorcise the bread demons out of my oven?

Recipe #1:
http://www.bigoven.com/119219-Outback-Steakhouse-Bread-recipe.html

Recipe #2:
http://restaurantrecipesbook.com/outback-steakhouse-bushman-bread-recipe/

Recipe #3:
http://www.lickthespoon.org/?p=203

I await your responses, bread masters!

Thursday, January 7, 2010

Oh, the weather outside is frightful...


...but muffins are so delightful!


I was inspired this morning to whip together some warm muffins to fend off the winter chill. What I love about muffins is that they are really quick and easy to make, and that you can add almost anything to them (fruit, nuts, cheese, meat... you name it).

This morning, I had pecans and dried cranberries on hand so... surprise! Cranberry pecan muffins - lightly sweet, more like fruity bread loaves. Here's the recipe in case you need some help fighting the brrrrs.

Cranberry Pecan Muffins
1-3/4 cups all-purpose flour
2-1/2 teaspoons baking powder
1/4 teaspoon salt
1 beaten egg
1 cup milk (or rice milk)
1/2 cup packed brown sugar
1/4 cup butter, melted, or oil
1/2 cup dried cranberries
1/4 cup chopped pecans (or walnuts)
dusting of powdered sugar (optional) - gives a little more sweet

Directions:
1) Preheat oven to 400 degrees F. Grease twelve muffin cups or line them with paper bake cups.
2) In a medium mixing bowl stir together flour, baking powder, and salt. Make a well in the center of the dry mixture.
3) In another medium bowl stir together egg, milk, brown sugar, and butter/oil. Add egg mixture all at once to the dry mixture. Stir just until moistened (batter should be lumpy - stirring too much will make your muffins tough). Fold in dried fruit and nuts.
4)Spoon batter into the prepared muffin cups, filling each 3/4 full. Bake for 20-25 minutes or until done (if a toothpick is inserted into center of muffin and toothpick comes out clean). Dust with powdered sugar. Serve warm. Makes 12.

Monday, January 4, 2010

The Yeast and I: Friends Again

Well, thank you so much to everyone who posted thoughts, suggestions, and encouragement. After using the kids' entire nap time to try every trick suggested, there was a satisfactory result:


What was I doing wrong? A couple of things:

1) Cold bowl that wouldn't warm up. It's important to make sure the bowl you use to let the dough rise is pre-warmed. A cold bowl = bored yeast. I was also told that warming the measuring cup for the warm water is also important. Since my Kitchenaid mixing bowl wouldn't warm up, I put a greased Pyrex bowl in the oven on low for a few minutes and transferred the dough. Much better.

2) It's possible I didn't have the water warm enough - apparently 130 degrees F is the best temperature for bread (warm enough to get the yeast excited but not too hot to kill it).

3) The kitchen wasn't warm enough. Following good advice, I preheated the oven to 175 degrees F and turned it off before putting the dough in to rise.

I was really starting to wonder if my dough was EVER going to rise after sitting so long in an inactive state. Let this be a lesson to all of you aspiring bread makers: don't give up on the dough too quickly! Try everything before giving up - it's worth the effort to have that smell of freshed baked bread permeating your house.

So thanks again to all my friends with their bread wisdom to share - it won't be another six months of despair before I attempt another loaf of bread. :)

And I must give kudos to Lisa - that sweet bread is AMAZING! It tastes very much like the rolls at O'Charley's. In case you need the link again to her recipe, here it is:


Yeast, why do you despise me?

So I have been trying for almost three years now to master the art of bread making. And I have to admit that the majority of my bread attempts have ended in disappointment. The only recipe that I have managed to complete with any real success has been Pioneer Woman's Cinnamon Rolls - everything else either doesn't rise, doesn't rise enough, or rises and then flattens out to an unattractive, hard loaf.

My most recent attempt was this morning: I am attempting to make my friend Lisa's recipe for Amish sweet bread. I proofed the yeast, and followed the rest of the recipe to a tee. I covered the dough over an hour ago to let it rise. When I went back to check on its progress, this is what I found:

It's enough to make you want to weep.

So I am sending out a cry for help into my cyber-hood and see if anyone can explain to me what I'm doing wrong. Here is what I have ruled out:

1) The yeast being old - I just used it a few weeks ago to make cinnamon rolls.
2) The water too cold - I made sure it was warm but not too hot.
3) Didn't rise long enough - I just checked it again, and after almost 2 hours, it STILL hasn't risen.

And here is what I want to ask about:
1) Do I need to warm up the bowl before I set the dough in it to rise? The metal bowl was a little cold but I hoped the water would warm it up.
2) I stirred the yeast this time since it's what the recipe said to do before I proofed it. Should I just sprinkle it in the water and leave it be until it bubbles?
3) Am I just yeast-challenged?

I await your wisdom.

Friday, December 19, 2008

Chocolate Truffle Cheesecake


Yes, you heard me. TRUFFLE CHEESECAKE. Anytime those two words are in the same sentence you know that happiness and world peace will soon follow.

I saw this recipe on Allrecipes and just HAD to try it. I'm going to be bringing it to the Tuckers' Christmas party tonight, so some of you can help taste test this recipe and let me know what you really think.


Now, the original recipe calls for a vanilla wafer crust but I thought I would follow others' suggestions and make a chocolate cookie crust instead.

So, start with about 3 cups of crushed Oreos in a gallon freezer bag and a rolling pin to crush and follow up with some smashing by hand. Then add 3 tablespoons of melted butter directly into the bag (less cleanup) and smash again.

When sufficient smashing has commenced, simply pour contents into springform pan and press down to cover the entire bottom of the pan. I think I should have probably smashed a little more... the crust is still pretty chunky. Oh well.


Now it's time to melt the chocolate - 2 cups (one bag) of semi-sweet chocolate chips on a double boiler. A metal (or glass) mixing bowl over a saucepan of simmering water works great. Melt and mix until smooth.


And now it's time for the star of the show: the cream cheese.

A moment of silence. (Cue angelic choir.)

Cream 3 (8 oz) packages of said dreamy goodness with tender affection, words of love, and biceps of steel (I'm still in the dark ages so it's just me and the spoon).


Now gradually add a 14 oz can of sweetened condensed milk... it's used in place of sugar, nice huh?


And now add the melted chocolate... ohhh, yesss... (sorry, blurry picture - the chocolate was wooing me)


And now 2 teaspoons of vanilla and 4 eggs... and BLEND!


Now we pour that chocolately cream cheesy goodness into the pan.


Bake at 300 degrees F for 55 minutes.
When it's done baking for the allotted time, turn off the oven but DO NOT remove the cheesecake from the oven!

Two reasons:
1) it allows the cake to cool gradually in the oven to prevent cracking
2) it will allow the cake to continue to cook a little longer since the middle is still a little underdone.
I let mine sit in the oven for about 2-3 hours, but even 1 hour would be sufficient.

In the meantime, find something interesting to do
like listen to your husband practice his mandolin.

After the cake has cooled, feel free to decorate
with fruit, whipped cream, drizzled white chocolate, or...
Red ribbon, white chocolate leaves (ask me how), and "holly berries" (atomic fire balls)

And that was it! Pretty easy, huh? I thought so - only seven ingredients to make a delightfully creamy, super rich, but not overly sweet chocolate cheesecake.


Hope you enjoy it, and let me know how yours turns out!

Bakefully yours,
Donna